metroid prime and metroid zero mission upgrades and expansions. first metroid prime, then metroid zero mission.
Tallon Overworld | ||
|---|---|---|
|
|
1. |
(Landing Site) |
|
|
2. |
(Transport Tunnel B) |
|
|
3. |
(Overgrown Cavern) |
|
|
4. |
(Frigate Crash Site) |
|
|
5. |
(Biohazard Containment) |
|
|
6. |
(Arbor Chamber) |
|
|
7. |
(Root Cave) |
|
|
8. |
(Great Tree Chamber) |
|
|
9. |
(Life Grove Tunnel) |
Chozo Ruins | ||
|
|
1. |
(Hive Totem) |
|
|
2. |
(Main Plaza) |
|
|
3. |
(Main Plaza) |
|
|
4. |
(Main Plaza) |
|
|
5. |
(Ruined Nursery) |
|
|
6. |
(Ruined Gallery) |
|
|
7. |
(Ruined Gallery) |
|
|
8. |
(Ruined Shrine) |
|
|
9. |
(Ruined Shrine) |
|
|
10. |
(Vault) |
|
|
11. |
(Ruined Fountain) |
|
|
12. |
(Gathering Hall) |
|
|
13. |
(Watery Hall Access) |
|
|
14. |
(Watery Hall) |
|
|
15. |
(Burn Dome) |
|
|
16. |
(Furnace) |
|
|
17. |
(Dynamo) |
|
|
18. |
(Dynamo) |
|
|
19. |
(Crossway) |
|
|
20. |
(Training Chamber Access) |
Magmoor Caverns | ||
|
|
1. |
(Storage Cavern) |
|
|
2. |
(Triclops Pit) |
|
|
3. |
(Fiery Shores) |
Phendrana Drifts | ||
|
|
1. |
(Phendrana Shorelines) |
|
|
2. |
(Phendrana Shorelines) |
|
|
3. |
(Ice Ruins East) |
|
|
4. |
(Ice Ruins East) |
|
|
5. |
(Research Lab Hydra) |
|
|
6. |
(Research Lab Aether) |
|
|
7. |
(Frost Cave) |
|
|
8. |
(Gravity Chamber) |
|
|
9. |
(Quarantine Monitor) |
Phazon Mines | ||
|
|
1. |
(Main Quarry) |
|
|
2. |
(Security Access A) |
|
|
3. |
(Elite Research) |
|
|
4. |
(Elite Control Access) |
|
|
5. |
(Phazon Processing Center) |
|
|
6. |
(Metroid Quarantine A) |
|
|
7. |
(Fungal Hall Access) |
|
|
8. |
(Fungal Hall B) |
|
|
9. |
(Metroid Quarantine B) |


Samus' Upgrades | Missile Locations | Power Bomb Locations
Energy Tank Locations | Artifact Locations
samus' upgrades on metroid prime. (easier than looking for it)
 |
Missile LauncherThe Missile Launcher gives Samus the ability to fire concussive projectiles. You'll need to locate more Missile Expansions to increase your payload, check out the Missile Tank locations section for all their locations. Press Y to fire missiles. Lock onto enemies before firing to discharge a homing missile. Fire missiles rapidly by hammering Y and A together repeatedly.Found in: Chozo Ruins (Hive Totem) You'll need to conquer the Hive Mecha in the ruins before winning this prize. Take a look at the bosses guide for tips on defeating this bug-summoning boss. Walk on forward once it shuts down to secure your first missile. |
| Go to walkthrough | |
|---|---|
 |
Morph BallBy pressing X once this classic item's in your possession will allow Samus to enter Morph Ball mode, changing her suit's shape to a metallic ball. You'll then be able to roll around through small openings Samus wouldn't normally fit through. You'll also eventually find a variety of other power-ups for Morph Ball mode.Found in: Chozo Ruins (Ruined Shrine) In the Ruined Shrine, you'll spot the Morph Ball waiting in a small alcove on the far side, but once in close proximity a barrier rises up to bar your path. You'll then have to fight off a multitude of Beetles lunging up out of the ground everywhere. Don't relax once they're all fried as another surprise awaits. A Plated Beetle promptly jumps out of the ground to challenge Samus to a good old fashioned duel. Show the bug who's boss by firing away at its red tail, once it's finished you'll have clear access to the Morph Ball. |
| Go to walkthrough | |
 |
Charge BeamAnother important addition to Samus' arsenal, the Charge Beam allows you to hold down A to charge up energy for any of the four beam weapons for a stronger blast. Once you find the missile combo attacks for each beam, charge up the weapon and press Y to fire the combo attack. Release A once fully charged to unleash the stronger shot.Found in: Chozo Ruins (Watery Hall) In the Watery Hall, you'll need to scan four symbols on the walls of the region to open up a gate concealing the Charge Beam's alcove. Look for one just to the left of the door as you enter the area, another hidden under a group of Blastcaps around the corner, and the remaining two near the gate itself. Once you've scanned all four scan the symbol on the gate to open it, then simply jump through and head on forward to receive your prize. |
| Go to walkthrough | |
 |
Morph Ball BombThe first add-on for Morph Ball mode, hit A to lay a small bomb which detonates after a few seconds. You'll be able to lay up to three bombs at a time. This explosive beauty can be used to blow open certain walls and obstructions.The bombs can also damage nearby enemies and propel Samus into the air while in Morph Ball mode, but you'll need to practice the technique a bit to get her soaring. There's no Spring Ball in this game, so the bomb jump trick is your best bet. Found in: Chozo Ruins (Burn Dome) You'll need to beat the Incinerator Drone and its Ram War Wasp cronies before receiving the Morph Ball Bomb. Refer to the bosses guide for tips on defeating this scorching drone. |
| Go to walkthrough | |
 |
Varia SuitThe legendary Varia Suit grants Samus more than just an upgraded appearance for her suit. You'll be able to survive the deadly extreme temperatures in the Magmoor Caverns, so there's no need for sunscreen with this hi-tech suit on.Found in: Chozo Ruins (Sunchamber) Before claiming the awesome Varia Suit, you'll need to defeat the huge insect-plant Flaahgra. Refer to the bosses guide to learn all about its weaknesses. Once the bug's cooked you'll spot the rotating Samus logo straight ahead. |
| Go to walkthrough | |
 |
Boost BallAnother handy add-on for Morph Ball mode, this item gives Samus the ability to charge up energy and release it to speed around like a hot rod. Hold B to charge up energy, then release to rocket off. Another benefit is that you'll be able to utilise large half-circle pipes to propel Samus up to enormous altitudes.The trick to gaining height on the half-pipes is to charge up the ball and release B just as Samus is about to roll upward in the pipe. Keep this up and you'll reach massive new heights. Found in: Phendrana Drifts (Phendrana Canyon) In the Phendrana Canyon region you'll find a long frozen curving canyon with floating platforms leading up to the entrance of a tall tower on the far side. Make your way up to the control panel at the head of the canyon and scan it to align all the platforms. Jump across them up to the tower to find the Boost Ball waiting snugly inside. |
| Go to walkthrough | |
 |
Space Jump BootsAs the name implies, this power-up lends Samus a double-jump move, allowing you to perform a second jump while in the air by pressing B a second time after jumping initially. Higher areas and larger gaps can be easily bridged with this vital ability.Found in: Tallon Overworld (Alcove) You'll need the Boost Ball before finding this upgrade. In the Tallon Canyon region, you'll find a half-pipe area where two Beetles launch out of the ground. Use the Boost Ball to reach the platform high up above. Go around to find a pathway eventually leading back to the Landing Site. Go straight ahead and over the gap in the ledge (don't fall down) to find a door. Head through to find the boots. |
| Go to walkthrough | |
 |
Wave BeamFinally adding to Samus' beam weapon arsenal, the electrified Wave Beam allows Samus to discharge powerful oscillating beams of electricity. Perfect for frying formidable Space Pirate troops, this weapon can also be used to open purple doors. Charged shots of the Wave Beam can also temporarily home-in on targets.Found in: Phendrana Drifts (Chapel of the Elders) You'll need the Space Jump Boots to reach this area. Check the walkthrough if you have any trouble making your way through the rooms leading here. Once in the large chapel you'll have to fight four Baby Sheegoths and then a fully-grown Sheegoth before claiming the Wave Beam. The juniors are pretty easy, but you might want to check the bosses guide for tips on defeating the adult Sheegoth. |
| Go to walkthrough | |
 |
Super MissileThe first missile combo attack, the Super Missile uses 5 missiles when discharged. This highly destructive corridor-clearer can destroy objects containing Cordite elements and packs a heck of a punch against enemy targets.Found in: Phendrana Drifts (Observatory) You'll find the Super Missile atop the upper holographic projector node in the Observatory. First you'll need to activate the hologram by scanning a few control panels and using the four Spinners, once the holographic star map appears jump up the platforms around the room to reach the missile combo upgrade. |
| Go to walkthrough | |
 |
Thermal VisorWith this heat-tracking visor you'll be able to detect objects emitting heat including enemy targets and various machinery. Activated via D-Pad Down, this visor will also act as a night vision enhancer allowing you to see properly in pitch-black areas. Press D-Pad Up while it's active to return to the trusty Combat Visor.Found in: Phendrana Drifts (Research Core) You'll find the first visor upgrade deep within the Space Pirate research facilities in Phendrana. Work your way through the complex and you'll eventually find the Research Core, a tall multi-leveled room. Fight off the Flying Pirates and gun turrets positioned around the room, then scan three critical panels to open up the force field below protecting the Thermal Visor. |
| Go to walkthrough | |
 |
Spider BallThe next add-on for Morph Ball mode, the Spider Ball allows Samus to activate a magnetic system in the Morph Ball. By holding down R while near a magnetic rail track, Samus can attach to the track and roll along it to wherever it leads - usually to areas previously inaccessible.Found in: Phendrana Drifts (Quarantine Cave) You'll need to defeat the rock monster Thardus before receiving the Spider Ball. Check the bosses guide for tips to turn Thardus back into a bunch of inanimate rocks. |
| Go to walkthrough | |
 |
Ice BeamFiring sub-zero blasts of ice, the Ice Beam can freeze certain enemies, especially when used with the Charge Beam. This weapon can also open up white doors. Various objects such as gun turrets and the flame projectors in Magmoor can be frozen solid with a single blast.Found in: Chozo Ruins (Antechamber) Once you've secured the Wave Beam and Spider Ball, head over to the Furnace. Go up the Spider Ball track (it's next to the hole leading to an Energy Tank) to reach the main area of the room, from here you'll be able to explore a whole new area of the ruins. Eventually you'll reach a room with a large pool and several Stone Toads (refer to the walkthrough for more details). Destroy the grate at the bottom of the pool to drain it, then use the Boost Ball to reach the upper part of the room (watch out for the greedy Stone Toads). Go through the door on the left side of the room (the left side when you first entered the room) to find the Ice Beam waiting inside. |
| Go to walkthrough | |
 |
Gravity SuitAdding a nifty purple colour scheme to Samus' suit, the Gravity Suit comes with more than slick looks. Once you've tracked it down Samus will be able to move around underwater as if she were above ground. You'll also be given a new visor enhancement to greatly enhance vision underwater.Found in: Phendrana Drifts (Gravity Chamber) The trek to the Gravity Suit is a long one, so I'll be brief here (check the walkthrough for more details). You'll need the Spider Ball and Ice Beam to find it. In Phendrana, go past the Quarantine Cave where you fought Thardus and head past the elevator leading down to Magmoor. You'll now enter a completely new area of Phendrana to explore, tucked away behind the Pirate's research labs. In this mini-maze make your way across to the Gravity Chamber (if you've got the hint system on it'll show you where it is). Once inside, work through the underwater areas filled with Aqua Reapers and Jetzaps, in the second underwater cavern you'll find the Gravity Suit in the form of the rotating Samus logo on the far side. |
| Go to walkthrough | |
 |
Power BombPacking one heck of a punch against anything nearby, a well-placed Power Bomb will vaporize anything in close proximity with its enormous explosive capabilities. You'll also be able to destroy any objects containing Bendezium with a single bomb. Unlike Super Metroid and Metroid Fusion you won't be able to carry many Power Bombs, so don't waste them.Found in: Phazon Mines (Central Dynamo) In the Central Dynamo room of the mines (on the middle level), you'll spot a large electrical structure in the center of the room above an electrified floor grating. Jump down to the structure to meet a nasty surprise, a cloaked Sentry Drone is hovering around. You'll need to destroy the drone before reaching the first Power Bomb, try to avoid its attacks while firing madly at it. You won't be able to lock-on so just keep firing with the Power Beam (or use the Wavebuster) and you'll take it down in no time. Once it blows you'll be able to drop down a hole in the ground using the Morph Ball. Down below is an intricate maze with coursing electricity acting as wall barriers - so don't touch any of them. You'll need to maneuver throughout the maze to reach the center where the Power Bomb waits. Blow the water balls with bombs to destroy some of the electric walls along the way, eventually you'll clear a path to the center. |
| Go to walkthrough | |
 |
Grapple BeamProbably the most entertaining power-up, this gem allows you to hang from certain Grapple Points by way of an energy beam. While hanging you'll be able to swing back and forth before releasing the beam to swing off and bridge gaps easily. When you see an icon above a Grapple Point, look up at it and it'll grow a little. Press and hold L to activate the beam and get airborne.Found in: Phazon Mines (Storage Depot B) Remember the Ore Processing room you went through earlier (the one with the rotating Spider Ball track pillar in the center)? Well, you'll probably have noticed a door at the top blocked off by a pile of rubble, simply go up there and blow the rubble away with a Power Bomb. Head inside to find the Grapple Beam waiting - easy. |
| Go to walkthrough | |
 this is my favorite! this is my favorite! |
X-Ray VisorThe final visor-enhancing device to be found, the X-Ray Visor allows you to see through solid objects. It can also detect invisible objects (they do exist) and you'll also be able to properly track certain enemies like the Chozo Ghosts and Flickerbats with L. Press D-Pad Right to activate this visor.Found in: Tallon Overworld (Life Grove) Once you've found your first Power Bomb in the mines you'll be able to find this final visor upgrade. Beyond the wreck of the Space Pirate Frigate you'll reach the large circular Great Tree Hall. From here, make your way up to the very top of the region using the intricate Spider Ball tracks to reach the door at the very top. Head through to find a small cave with a large rock blocking a small hole. Use a Power Bomb to blow the rock apart, then head on in. You'll need to use the Boost Ball to get through a narrow O-shaped tunnel (there's a missile hidden in here too) to reach the Life Grove. Once inside jump down below to find the X-Ray Visor. |
| Go to walkthrough | |
 |
WavebusterThe second missile combo attack is an electric attack for the Wave Beam. This devastator uses 10 missiles when activated, plus a following 5 every second it remains active. Holding down A while firing this continues the attack, producing a massive electrical beam - very effective when bombarded by enemies.Found in: Chozo Ruins (Tower of Light) Naturally you'll need the Wave Beam (and the Super Missile and Spider Ball) to reach this upgrade. From the Main Plaza room, go through the missile-locked door to eventually reach the room where you found the Morph Ball. Use the Boost Ball to reach the Spider Ball track on the roof then go over to the purple door and head through. Eventually you'll reach the Tower of Light, the Wavebuster's right at the top. Jump up to the platform above, then use Super Missiles to break the cracked blocks on each wall, there's four blocks per level. With the support blocks destroyed, the tower's entire wall structure will crash down, ascend the tower before the Plated Puffers appear, then keep blasting the cracked blocks (be careful not to hit the Oculus crawling over the blocks) to eventually reach the top. |
| Go to walkthrough | |
 |
Ice SpreaderThis baby's the missile combo attack for the Ice Beam. Using 10 missiles, once fired Samus' arm cannon expels a freezing ice projectile, which upon striking something expands and spreads ice out all over the surrounding area. Nifty.Found in: Magmoor Caverns (Shore Tunnel) In the Shore Tunnel you'll find yourself in a somewhat nondescript metal tunnel within a lava-filled cavern. Look closely (or use the scan visor to reveal it) and you'll notice fractures throughout the center part of the tunnel. Use a Power Bomb to blow open the tunnel (just like old times in Maridia), drop down below to find the Ice Spreader underneath the tunnel. |
| Go to walkthrough | |
 so is this one! so is this one! |
Plasma BeamAppropriately found in the Magmoor Caverns, the Plasma Beam is the strongest beam weapon you'll find. Capable of disintegrating certain targets, this red-hot fire spewing cannon will come in real handy against the larger boss targets. Also a great corridor-clearer, this one is.its fun to use on space pirates! Found in: Magmoor Caverns (Plasma Processing) You'll need the Ice Beam, Power Bombs, Grapple Beam and Spider Ball to reach this. In the Geothermal Core room, use the Grapple Beam to jump up to one of the three large pillars. Use the Spinner slots and Spider Ball tracks to reach the highest platform of the three pillars and activate the Morph Ball slot hidden there. The pillars will rise up and push the roof up higher, revealing an intricate series of Spider Ball tracks all around the walls. Make your way across the tracks (don't fall) and watch out for the Plated Parasites. Once you reach the door, lay a Power Bomb while still attached to the Spider Ball track to destroy the rubble in front of the door. Go inside to find the Plasma Beam. |
| Go to walkthrough | |
 |
FlamethrowerThis one speaks for itself. Using 10 missiles to fire and then a following 5 every second, the Plasma Beam's missile combo unleashes a long beam of continuous deadly flame. Sizzling and burning anything in its path, use this torcher for maximum firepower.Found in: Phazon Mines (Storage Depot A) Once again you'll need a Power Bomb to find this one. In the Mine Security Station (the room filled with Space Pirates jumping down out of the roof), not far from the entrance you'll find a red door blocked off by a red force field. On the next level above this door (near the purple door in the roof) is a wall blocking a computer console. Blow apart the wall with a Power Bomb and scan the console to power down the force field. Head through the red door below to find the Flamethrower in the adjacent room. |
| Go to walkthrough | |
 |
Phazon SuitCorrupting (???) Samus' Power Suit with pure Phazon, the Phazon Suit somehow protects Samus from damage when she comes in direct contact with the eerie blue substance. Her suit also receives a new black and red colour scheme along with the Phazon Beam described below. Samus' defense power will also greatly increase, just another of those handy side-effects.Found in: Phazon Mines (Elite Quarters) Defeat the hideous Omega Pirate in the mines to win the Phazon Suit and Phazon Beam. Refer to the bosses guide for really handy hints on defeating the Pirate's Phazon king. |
| Go to walkthrough | |
 |
Phazon BeamYou'll score this final beam weapon along with the Phazon Suit. Apparently corrupting Samus' arm cannon (even though there's absolutely no bad side effects) you'll be able to use the Phazon Beam while standing on pure Phazon concentrations.SPOILERS AHEAD!! You'll only be able to use this in the final battle against Metroid Prime when it creates large pools of phazon on the cavern's floor. When active the arm cannon will emit a weird blue glow around itself. Fire to expel deadly blasts of Phazon. Found in: Phazon Mines (Elite Quarters) You'll receive this along with the Phazon Suit after frying the Omega Pirate. |
| Go to walkthrough | |


Samus' Upgrades | Missile Locations | Super Missile Locations
Power Bomb Locations | Energy Tank Locations


Samus' Upgrades | Missile Locations | Power Bomb Locations | Energy Tank Locations
now metroid primes: 1,2,3 and hunters!
 these are samus' upgrades on metroid prime 2 EcHoEs these are samus' upgrades on metroid prime 2 EcHoEs |
Missile LauncherThe Missile Launcher grants Samus the ability to discharge highly concussive projectiles. You'll only start with five missiles in your payload, so you'll need to track down the many Missile Expansions riddled throughout the game for more.Check out the Missile Locations section for the entire list. Press Y to fire. If you lock onto a foe with L before opening up, the missile will home-in on its target. Use missiles to destroy red blast shields covering certain doors. Fire missiles rapdily by pressing Y and A together repeatedly. Found in: Temple Grounds (GFMC Compound) You'll find the Missile Launcher packed inside the oversized yellow-marked ordinance crate on the port side of the GF trooper's ship. Blow it open with a blast from the Charge Beam to reveal your prize. |
| Go to walkthrough | |
|---|---|
 |
Morph Ball BombThe primary add-on for the Morph Ball, this ability grants you the power to lay explosive bombs while in Morph Ball mode. Up to three can be laid at any time before a delay in delivery occurs. The explosions generated are harmless to Samus, yet strong enough to destroy smaller foes. The bombs can also be used to destroy objects composed of Talloric Alloy.The bombs can also propel Samus up into the air slightly while in Morph Ball mode, but you'll need to practice the technique to propel her even higher. Found in: Agon Wastes (Agon Temple) The Bomb Guardian possesses your Morph Ball Bomb. Destroy its oily hide to recover this trusty ability. Refer back to the bosses guide for tips to beat this guardian easily. |
| Go to walkthrough | |
 |
Space Jump BootsAnother important ability, without this Samus can't explore much of her surroundings. The Space Jump Boots grant Samus a double-jump, press B after an initial jump to launch yourself higher. Use it often and time the second jump to bridge ravines and cushion large falls.Found in: Dark Agon Wastes (Judgement Pit) The vile Jump Guardian inhabiting the Dark Agon Wastes has stolen your Space Jump Boots ability. You'll need to crush this monster in its homeland to recover it. Refer to the bosses guide for tips to survive this heated battle. |
| Go to walkthrough | |
 |
Dark BeamSamus' first new beam weapon of the day. The Dark Beam grants Samus the ability to discharge rounds of dark energy attuned to the damaging atmosphere of Dark Aether. The weapon is best used against foes on Aether, as it won't deal much damage to the Ing or other inhabitants of Dark Aether.Especially useful against Metroids, this weapon also possesses a limited freezing ability when charged. Both the Dark and Light Beams consume ammo when used, destroy enemies or objects with the Light Beam to recover Dark Beam ammo and vice versa. If you run out of ammo, you can still fire a shot from the beam by charging it up. Also use the Dark Beam to open black doors. Found in: Agon Wastes (Storage D) You'll be clear to find the Dark Beam once you've claimed the first Dark Temple Key in Dark Agon. Right before finding it you'll have your first confrontation with Dark Samus, for precise directions refer back to the walkthrough as you'll be exploring a fair deal of the Space Pirate's facility in Agon before finding this weapon. |
| Go to walkthrough | |
 |
Light BeamThe Light Beam discharges pulsing beams of pure light energy. Perfectly suited to combat the denizens of Dark Aether, with enough concentrated fire the beam can set most targets on fire. Firing a blast at a Light Crystal or Light Beacon will supercharge the device, creating a safe zone capable of destroying any Ing haplessly wandering within range. Use the Light Beam to open up white doors.Found in: Dark Agon Wastes (Ing Cache 1) With the Dark Beam in your possession you'll be able to enter the Dark Agon Wastes via the portal in the Command Center. Once inside, follow the rooms from there until you reach the Feeding Pit. Raise the two columns inside by firing Dark Beam shots at the Light Crystals attached to each, then climb up to the black door above. Inside you'll find the Light Beam waiting patiently. |
| Go to walkthrough | |
 |
Dark SuitThis fancy new suit grants Samus added protection against regular attacks and slows the caustic effects of Dark Aether's corrosive atmosphere on her suit's shielding.Found in: Dark Agon Wastes (Dark Agon Temple) You'll need to conquer the enormous Amorbis in the Dark Agon Temple before claiming this prize. Refer back to the walkthrough for directions on where to find all three Dark Temple Keys and the bosses guide for tips to cook Amorbis' hide. |
| Go to walkthrough | |
 |
Super MissileThe first Charge Combo you'll receive is the Super Missile. Just like in Metroid Prime, this weapon unloads a devastating single missile attack. Using 5 Missiles per shot, this destructive projectile is also capable of destroying green blast shields covering a number of doors on the planet. Fire one by firstly charging up the Power Beam, then while holding A press Y.Found in: Torvus Bog (Torvus Temple) The Super Missile is locked away in the Torvus Temple. Upon reaching the temple, deal with the numerous Space Pirate foes you encounter, upon which the force field covering this item will disappear, granting you access to your prize. |
| Go to walkthrough | |
 |
Boost BallA classic ability from Metroid Prime, the Boost Ball allows Samus to travel at increased speeds while in Morph Ball mode. Enemies rammed immediately after launching the ball will receive slight damage while Samus escapes with none. Hold B while in Morph Ball mode to charge up the Boost Ball, then release it while moving to propel Samus.The Boost Ball's real power shines when used on a half-pipe. To launch yourself to great heights, charge the Boost Ball and release it just as you roll upward into the pipe. With practice you'll be able to reach incredible altitudes. Found in: Dark Torvus Bog (Dark Torvus Arena) Take the northern exit from the Torvus Temple and follow the path to the Torvus Grove. Beyond here lies the Meditation Vista and an inactive portal. Scan the terminal to charge up the portal and step inside. Once in Dark Aether, follow the path till you reach the Dark Torvus Arena (make certain to save your game along the way). Defeat the Boost Guardian you discover there to reclaim this ability. |
| Go to walkthrough | |
 |
Seeker LauncherThe Seeker Launcher is a great new toy for your arsenal. With this device you'll be able to fire up to five missiles all at once at either single or multiple targets. When surrounded by multiple targets, fire a missile and hold Y. A target reticule will appear at the tip of the arm cannon, when it does wave it over a target to "paint" it.Do the same for up to five separate targets and release Y to unleash the assault. You'll need this weapon to destroy purple blast shields sealing doors with five lock pods surrounding the door. As an added bonus you'll also receive an extra 5 maximum missiles for your payload. If you want to avoid wasting a single missile to engage the launcher, activate the Scan Visor and hold Y to return to the Combat Visor and power up the Seeker Launcher. Found in: Temple Grounds (Hall of Honored Dead) Once you've recovered the Boost Ball from Dark Torvus and have the Super Missile Charge Combo in your arsenal, return to the Temple Grounds. At the Meeting Grounds area, boost yourself up the half-pipe there and roll through the small opening in a nearby cave atop the half-pipe. Boost across the breakable floor sections in the Service Access room and follow the tunnels till you bypass a purple door and enter the Hall of Honored Dead chamber. The Seeker Launcher resides inside a containment unit at the center of this massive chamber. You'll need to use the four Spinners placed at the foot of each giant Luminoth statue. Each Spinner controls one or two rotating locks in the floor around the unit, you'll need to get them all glowing to unlock the unit. Experiment with the locks until you align them all, once you do a large lens assembly will rise from the floor and focus light rays onto the containment unit, shattering it. Now you can claim your prize. |
| Go to walkthrough | |
 |
Gravity BoostYou'll be needing this device to move about freely underwater. The device also grants Samus a limited boost while underwater. Space Jump as you normally would while underwater then press and hold B to activate the boost. Normally out-of-reach underwater platforms can easily be reached with this. You'll also be granted free movement and enhanced vision while underwater.Found in: Torvus Bog (Hydrochamber Storage) Once you've secured the Seeker Launcher, head down to the depths of the Torvus Bog. In the Hydrodynamo Station you'll need to scan three terminals to unlock a door at the very base of the shaft. Unlock the first terminal near the bottom of the shaft, then blow off the purple blast shield on a door you can now access. Travel to the Training Chamber beyond and take both paths leading out of this room individually to reach rooms that will ultimately lead back to the Hydrodynamo Station, granting you access to the other two terminals. With all three locks disengaged, travel through the door at the base of the shaft. Keep descending beyond till you reach the Main Hydrochamber. Search for a door on its southern side, then head inside to find this item waiting for you in the deepest region of the planet. |
| Go to walkthrough | |
 |
Grapple BeamOnce again you'll be needing the swinging ability of the Grapple Beam in this adventure. When you spot an icon hovering below a grapple point in the environment, look straight at it. When the icon grows slightly, press and hold L to engage the Grapple Beam. From there you can swing around freely and this time retain the ability to fire your arm cannon.Found in: Dark Torvus Bog (Sacrificial Chamber) You'll need to conquer the nasty Grapple Guardian to recover this. Once you've picked up the Gravity Boost, head to the Catacombs chamber in the Torvus Bog and open up access to the inactive Dark Portal there by way of an underwater Bomb Slot. Once in Dark Aether, make your way around to the Undertemple Shaft (you'll pass through the lower section of the Sacrificial Chamber along the way), then from there you can access the main upper section of the Sacrificial Chamber where the Grapple Guardian awaits. Refer to the bosses guide for tips to finish the beast off. |
| Go to walkthrough | |
 |
Dark VisorThis hi-tech visor will certainly help you out in more ways than one. All enemies in view will glow red while the visor's active, and any dimension-jumping Ing won't be able to hide from your sights. The visor can also detect trans-dimensional objects and anything else not normally detectable in the visible spectrum. Press D-Right to activate the Dark Visor.Found in: Dark Torvus Bog (Dark Torvus Temple) To secure this new visor you'll need to conquer the Chykka Guardian in the Dark Torvus Temple. Refer to the walkthrough and bosses guide for tips to locate the three Dark Torvus Temple Keys and hints to send the massive dragonfly on its way. |
| Go to walkthrough | |
 |
Spider BallBy the time you recover the Spider Ball you'll have discovered a myriad of special magnetic tracks around the environment. By holding R while in Morph Ball mode, you'll be able to attach Samus to any of these tracks and move around freely on them. This will open up many new areas to explore (some weirder than you think).Found in: Sanctuary Fortress (Dynamo Works) Recovering the Spider Ball requires you to locate and defeat the immensely annoying Spider Guardian in the Sanctuary Fortress. Refer to the walkthrough for precise directions, and check out the bosses guide for tips to eliminate this creature with hopefully a less-than painful experience. |
| Go to walkthrough | |
 |
Power BombA deluxe explosive deployed while in Morph Ball mode, the Power Bomb effectively incinerates any hostiles unluckily nearby. The bombs are also capable of penetrating objects composed on Denzium. There's only a few to be found in the game, so use them wisely.Found in: Dark Torvus Bog (Undertemple) Once you've recovered the Spider Ball, you'll be able to locate this power-up. Dive to the very depths of the Torvus Bog, way down to the Main Hydrochamber where you faced the Alpha Blogg. Reach the Dark Portal on the northern side of the chamber via the Spider Ball track, then transit to Dark Aether. Drop off the ledge you appear on and enter the main chamber to confront the Power Bomb Guardian. Defeating this monster rewards you with your first Power Bomb, check the bosses guide for tips to send it away. |
| Go to walkthrough | |
 |
DarkburstThe Darkburst is the Dark Beam's deadly Charge Combo. Unleash this attack to generate a massive swirling vortex capable of drawing any nearby enemies to their doom (thankfully it doesn't affect you). One shot drains 5 missiles and 30 Dark ammo from your arsenal.Found in: Agon Wastes (Mining Station B) To recover this item you'll need the Boost Ball and Seeker Launcher. Mining Station B lies beyond the Mine Shaft (beside the Agon Temple). Use the Seeker Launcher to breach the purple blast shielded-door in the Mine Shaft and move through to locate the Darkburst's home. You'll need to play with the mining drill, transit to Dark Aether, then find your way back here to reach the Darkbusrt, refer to the walkthrough for precise directions. |
| Go to walkthrough | |
 |
SunburstThe Light Beam's Charge Combo. This weapon unloads a ball of pure white light upon which slowly travels towards its target. Any hostiles in close proximity to the ball are instantly set alight (if not incinerated). The ball unleashes a massive blast of pure light energy upon impact. Each shot drains 5 missiles and 30 Light ammo. The deadliest weakness of all Ing, use this against a group of slower-moving enemies for best effect.Found in: Temple Grounds (Grand Windchamber) You'll need the Boost Ball, Power Bombs, Seeker Launcher and Grapple Beam to secure this item. Head to the Path of Eyes region in the Temple Grounds and proceed through the green blast shielded-door on the northern side of the area. Proceed through the Windchamber Gateway and blow off the yellow blast shield covering the next door with a Power Bomb. Inside is the huge Grand Windchamber - the Sunburst is waiting atop the large structure in the center of the area. But to reach it, you'll need to first travel to Dark Aether via the nearby portal. Once there, see the Spinners positioned around the central structure? Use each one to rotate one of the half-circle rings attached to the central structure. Firstly, rotate all the rings and line them up so they all glow yellow. Travel around to the front of them, lock onto all four pods attached to each ring with the Seeker Launcher and open up to activate the system. Doing so will raise two metal arms outward from the structure. Rotate all the rings again to the opposite side so they all glow blue. Travel around to the front of them again and use the Seeker Launcher to activate the system. Two more arms will raise out around the structure before all the control rings promptly fall off into the chasm below. Return to Aether and use the Grapple Points on the extended arms to reach the lone platform where a Kinetic Orb Cannon resides, then simply jump in the cannon to be launched atop the structure where the Sunburst awaits. |
| Go to walkthrough | |
 |
Echo VisorThe final new visor for the day. The Echo Visor enables you to effectively see sound waves bouncing around the environment. Naturally you'll be blind to almost everything else, so don't use the visor unless there's a specific need. Use this to see and interact with sonic security systems. Also use this against foes who remain invisible to both the Combat and Dark Visors. Press D-Pad Down to activate this visor.Found in: Sanctuary Fortress (Aerie) You'll need the Spider Ball and Power Bombs to reach this. Return to the Main Gyro Chamber and travel up to the door leading to the Sanctuary Temple. Destroy the fallen canisters above the Bomb Slot at the observation window, then energize it to bring up three coloured power conduits on the window. Rotate the corresponding nodes to line up with the correct conduits to cause a second Bomb Slot to rise from the floor. Energize this one to shut down the rotating inner gyro wheel, revealing a Spider Ball track running along it. Go down inside the gyro chamber and climb up along the inner gyro ring. Boost yourself into the cracked glass window to gain access to the yellow door on the northern side of the room. Blow the blast shield off the door with a Power Bomb and enter the room beyond to witness Dark Samus take out three Dark Pirate Troopers. Follow the beast around and exit the room via the next door to reach the base of a huge elevator shaft. You'll now need to take down Dark Samus before recovering this - refer back to the bosses guide for tips. With the area clear, step out through the wall section Dark Samus destroyed and walk along the balcony you find to locate an inactive Dark Portal. Power it up and transit to Dark Aether. Once there, walk around the balcony and climb up the Spider Ball track at the end to access the main chamber. See the Spinner across the other side of the room? Use it to rotate the Spider Ball track assembly in the center of the chamber. Then, climb up the tracks and boost yourself up to a ledge above. Jump across to the inactive Light Portal and travel back to Aether. Finally, jump across to the ledge ahead where your prize awaits. |
| Go to walkthrough | |
 |
Screw AttackThe awesome Screw Attack finally makes the jump to 3D. With it you'll be invulnerable while it's active and can bridge huge horizontal chasms with ease. Engage the Screw Attack by jumping forward, hit B a second time for a Space Jump then press it a third time. You'll have a third-person view of Samus as she performs the attack.Time consecutive jumps with B to keep her going for up to five jumps. You'll definitely need practice to master it, but eventually you'll be bridging gaps and climbing up those special Screw Attack walls in no time. Found in: Sanctuary Fortress (Vault) You'll pick up the Screw Attack after securing the Echo Visor. It's a fairly long trip to the Vault for this item, so refer to the walkthrough for complete directions and details on what to do once you're there to secure this lovely new toy. |
| Go to walkthrough | |
 |
Annihilator BeamThe mother of all beams on Aether, this mighty cannon combines the power of the Light and Dark Beams to produce an energy blast deadly to foes of both worlds. Don't underestimate the modest projectile it launches, just use it sparingly as each shot drains 1 round of ammo from both your Light and Dark Beams. Even if you're not locked onto a foe, the blast can automatically home-in on a nearby target.The Annihilator can also be used to interact with certain sonic security systems in tandem with the Echo Visor. Found in: Ing Hive (Hive Temple) You'll need to locate all three Hive Temple Keys (and a number of items) before unlocking the Hive Temple. Refer to the walkthrough for details and directions, then refer to the bosses guide for tips to defeat the guardian of the temple, Quadraxis, to claim this deadly beam weapon. |
| Go to walkthrough | |
 |
Light SuitThe ultimate suit available to Samus. Upon restoring all three planetary energy collectors, U-Mos will grant you the Light Suit at the Great Temple. Not only will your defense level increase, you'll also now become completely immune to the damaging effects of Dark Aether's atmosphere, allowing you to spend as much time as needed in the dark world.As an added bonus you'll be able to access a light energy transit system granting instant access between the four energy controllers. Found in: Great Temple (Main Energy Controller) Simply restore the planetary energy to all three temples of Aether and visit U-Mos to be granted the ultimate protection available to Samus. Easy. |
| Go to walkthrough | |
 |
Sonic BoomThis deadly Charge Combo utilises the Annihilator Beam. Delivering a severe projection of sonic force, enemies caught off guard by the blast won't survive the impact. The funky blast impacts whatever solid object stands before you very quickly, so use it to catch fast-moving targets off guard. Use it sparingly as each blast drains 5 missiles, 30 Light ammo and 30 Dark ammo.Found in: Dark Agon Wastes (Ing Cache 2) The Annihilator Beam and Screw Attack will allow you to track this final item down. Head to the Phazon Site at the Dark Agon Wastes to find the area inhabited by three Dark Tallon Metroids. Deal with all three customers and look up to see a gray door way up on an out-of-reach ledge. Climb atop the middle of the three floating platforms, then simply Screw Attack across to the ledge to reach it neatly. Open the door with the Annihilator to find the Sonic Boom awaiting you in the following chamber. |
| Go to walkthrough | |
Samus' Upgrades | Missile Locations | Power Bomb LocationsEnergy Tank Locations | Beam Ammo Expansion Locations | Dark Temple Key Locations
next, metroid prime hunters weapons and expansions, THEY ROCK!!!!!!!!!!
BattlehammerThe Battlehammer discharges heavy green energy projectiles capable of automatic fire (tap fire manually for a faster delivery rate). Use this weapon against electric-based foes, especially when they wield the Volt Driver. Every shot travels over a short parabolic distance before striking the ground so you'll need to aim higher to lob each blast further.Found in: Vesper Defense Outpost (Cortex CPU) Firstly, search for a small narrow tunnel leading out of the Weapons Complex area. Follow the tunnel along thanks to the Morph Ball to locate the Cortex CPU region. In here you'll also discover Missile VD.01 on your way through. Once you've secured the missile, work your way over to the left side of the tunnel where you'll discover a tall shaft filled with pulsating green laser fields. See the small jump pad on the edge of the platform? Wait for the laser fields to disappear then quickly roll into the pad, watch as Samus launches up to an exit way up at the apex of the shaft. Roll through the narrow tunnel beyond past a scenic locale to discover a tiny chamber. Stand up and scan the central object in the chamber for your Logbook, then scan each of the four spectral switches surrounding it to summon forth your prize from below. | |
| Go to walkthrough | |
|---|---|
JudicatorUsing a sub-zero energy core, the Judicator is capable of firing thin blasts of freezing ice. The projectiles can bounce off a limited number of objects when fired, and can usually either freeze or destroy most targets with a few hits. Use a charged shot to unload three ice projectiles simultaneously. Use this against magma-based foes and those wielding the Magmaul.Found in: Arcterra (Ice Hive) After you've opened up the large vault door in the Ice Hive, follow the path beyond to discover stone ruins where the Judicator awaits. It rests high atop a ledge above, so you'll need to climb around the region to reach it. Firstly, jump up and over to the wall lined with narrow tunnels. See the object nearby emitting a blue glow? Scan this object to rotate a number of platforms above, making them suitable to cross. Quickly enter Morph Ball mode and bomb-jump over to the nearby moving platform inside the wall. Ride it up and roll along the catwalk, eventually reaching a motionless platform. As you roll atop it you'll be taken over to the second set of rotated platforms. Carefully roll across to the other side, then simply follow the path to easily reach your prize. | |
| Go to walkthrough | |
Volt DriverThis weapon delivers small but fast electric projectiles capable of travelling over long distances. Use a charged shot to unload a large bolt of electricity. Wield this weapon against foes utilising Battlehammer weaponry.Found in: Celestial Archives (Data Shrine 02) Once you've picked up the Battlehammer, return to the Archives and head for the Data Shrine 02 area. Once inside, you'll discover the central region of the area's sealed by four green blast-shielded doors. Simply breach one with a burst of the Battlehammer and head inside to face two rowdy Guardians. Destroy both and hop atop the bridge structure in the center of the chamber to snag UA Expansion CA.02. See the small floating platform nearby? Jump across to reach the far wall and sneak through the narrow opening in the wall to find the Volt Driver awaiting inside a small alcove there. | |
| Go to walkthrough | |
Shock CoilA Federation prototype, this weapon delivers a continuous stream of deadly electricity over a short-to-medium range. Hold the fire button to keep the weapon rolling, just watch your ammo as it'll slowly drain as long as the weapon's active. Use this against enemies wielding the Imperialist. Also keep in mind that after several seconds of use the Shock Coil's damage rate will dramatically increase.Found in: Celestial Archives (Incubation Vault 02) The Shock Coil lies in the depths of Incubation Vault 02. Getting there is going to take a while. From the Docking Bay, follow the route to reach the Attameter Artifact in Incubation Vault 01. Once you've scored the artifact, take the teleporter further down the bridge beside the incubation tank to reappear at the top of Incubation Vault 02. Go inside the alcove beside you and drop to the bottom of the chamber; at the base you'll discover this weapon waiting patiently. | |
| Go to walkthrough | |
MagmaulThis weapon lobs rounds of deadly magma which bounce along the ground upon impact. Fire up a charge shot to release a stronger blast, just watch your aim as the projectiles travel over a parabolic short distance. Use this against ice-based foes or anything wielding Judicator technology.Found in: Alinos (Council Chamber) You'll need the Judicator to start the journey to this weapon. Head to the High Ground area and look for a tall purple force field barring access in the corner (after dealing with any rival hunters or pesky Guardians). Disable the field and turn right, heading up the stone ramp beyond. Destroy the turret firing at you from above and emerge onto a balcony overlooking the main area below. Scan the visible switch nearby to summon a moving platform, of which you can ride across to the purple door beyond the drop. Open the door up with the Judicator and proceed through. Follow the path to eventually reach the large Alinos Perch canyon. Take apart the trio of Guardians ambushing you here to unseal a door at the base of the canyon. Head inside to find a large lava lake around the corner. Step to the edge to awaken a Fire Spawn from the fiery depths. Unload your Judicator into its weird face when it opens, just take cover and watch for flying blobs of lava. Finish this beast off to reveal the Magmaul awaiting you atop a stone perch. | |
| Go to walkthrough | |
ImperialistA precise and deadly piece, the Imperialist fires a long pinpoint laser beam with incredible range. With the weapon selected, double-tap the red icon or press R to zoom in, giving you a perfect sniper advantage. You'll need to be accurate though, as each shot comes with a few seconds of cool-down time. Wait till you hear the weapon charge up and hear the cocking sound before firing again. Use this against any foe from a distance, or against those wielding the Shock Coil.Found in: Arcterra (Fault Line) Once you've scored the Magmaul, head to Arcterra and proceed to the Sic Transit area. In the very corner of this area you'll discover a door sealed by an orange blast shield. Use the Magmaul to break through and find the Fault Line region beyond. The first cavernous area's filled with a number of Quadtroids, destroy them all to lower the force fields barring access outside. Step outside to greet an Arctic Spawn who's not very happy to see you. Scan it then unload the Magmaul into its weird face when it opens to inflict damage. Rub the touch screen if it manages to freeze you. Upon yielding, your prize will appear beside the red blast shielded-door ahead. | |
| Go to walkthrough | |
Omega CannonThis weapon may very well be the ultimate power alluded to by the Alimbic Order. They say its very use is harmful to the wielder, but when you've got a nasty monster floating about throwing meteors at you capable of moving through solid objects, there's not much else you can do. Use this against Gorea's final phase, each blast will cause the screen to flash so don't get disoriented.Found in: Oubliette MAJOR SPOILER!!! The Omega Cannon awaits you in the final chamber during the second Gorea battle. You'll need to complete the Alimbic spectral sequence during the first battle to reach the second, then find this ultimate weapon awaiting you at the base of the elaborate chamber (step towards it and the shield protecting it will automatically lower). Check the bosses guide and walkthrough for more details to unlock the final Gorea battle. | |
| Go to walkthrough | |
Samus' Weapons | Missile Locations | Universal Ammo Expansion Locations
Energy Tank Locations | Artifact Locations
 |
Missile LauncherSamus' trusty Missile Launcher grants her explosive projectiles more potent than her regular Power Beam fire. The Missile Launcher itself comes equipped with five Missiles, while every other Missile Expansion found increases your payload by a further five. Refer to the Missile Locations section for more details.Press Y to fire missiles. If you lock onto an enemy before firing, your projectile will home in on the target. Also use Missiles to destroy objects containing Brinstone and to dismantle red blast-shielded doors. Found in: GFS Olympus (Munitions Storage) The Missile Launcher awaits aboard the Olympus in the Munitions Storage chamber. Scale the vast Repair Bay A chamber and the enter the small chamber to find it waiting inside. |
| Go to walkthrough | |
|---|---|
 |
Grapple LassoYour first Grapple Beam addition, the Grapple Lasso allows Samus to attach the beam to smaller objects such as blast shields and portable infantry shields to promptly tear them from their mounting or owner. Look for gold shimmering objects and lock onto the C icon before deploying the beam by casting the Nunchuk forward. Pull the Nunchuk back to tear the object away.Found in: Norion (Docking Hub Alpha) You can't miss the Grapple Lasso - find it inside a small chamber right after landing on Norion. Open the door by shooting the red lock switch. |
| Go to walkthrough | |
 |
Phazon Enhancement Device (PED) SuitWith her body self-generating Phazon, the Phazon Enhancement Device (PED) Suit allows Samus to tap into these reserves and turn the potent substance into a deadly weapon. Mastering use of the PED's Hypermode is key to your victory, so check out the Hypermode Guide for more details.Found in: GFS Olympus (MedLab Delta) You'll receive the PED Suit automatically after Samus awakens from her month-long sleep following the Pirate attack on Norion. This gift from the Federation will remain with her throughout the rest of the game, so be sure to accustom yourself with the ins and outs of Hypermode. |
| Go to walkthrough | |
 |
Grapple SwingAs the name suggests, the Grapple Swing allows Samus to swing from Grapple Points scattered throughout environments. Just like in previous Prime titles, lock onto the C icon above a Grapple Point and cast the Nunchuk forward to latch on and swing around. Keep in mind that while swinging Samus can continue to fire her weaponry.Found in: Bryyo (Reliquary I) From the giant Gateway chamber, open the sealed door by releasing both locks and make your way through to the Grand Court. Conquer the pair of Reptilicus Hunters ambushing you there and move through to the Hillside Vista. Make your way to the opposite cliffside via the tunnels along the wall (use the Snatchers to traverse the tunnels, but watch out for the Korba). Use the Grapple Lasso and a Missile to dismantle the statue covering the door you find, then simply step inside the chamber to discover your prize waiting inside. |
| Go to walkthrough | |
 |
Ice MissileRather than your standard Ice Beam, Ice Missiles take center stage as Samus' ice-powered projectiles. Use Ice Missiles to freeze targets in their tracks (some foes need a few shots to slow them down), and dismantle white blast shields with a single Ice Missile.Found in: Bryyo (Bryyo Fire - Temple of Bryyo) You'll need to conquer Rundas in the Temple of Bryyo to secure this upgrade. Refer to the bosses guide for tips to win this upgrade. |
| Go to walkthrough | |
 |
Ship MissileSamus' gunship can only go so far without ballistic capabilities. With the Ship Missile upgrade, Samus can command her ship (via the Command Visor) to perform bombing runs on fortified objects from shield generators to massive blockades. She can also summon her ship to lay down ordnance on hostile targets in open areas.Initially upon receiving this upgrade you'll begin with three Ship Missiles in your arsenal, but can expand that number up to 11 by locating Ship Missile Expansions. Check the Ship Missile Locations for details on where to find them all. Found in: Bryyo (Hangar Bay) Upon securing the Ice Missile upgrade, head to the downed GF frigate and make your way through the Falls of Fire by freezing the Fuel Gel spouts along the chasm. Explore the regions beyond, move through the Hidden Court area and up the Ruined Shrine to ultimately find yourself at the Hangar Bay. At first glance the area seems completely deserted, but step towards the lift in the corner of the chamber or the Missile upgrade terminal to see otherwise. Repel the Reptilicus Hunter invasion to secure the area and bring the systems back online. First things first, you'll need to open up the hangar bay door to allow your ship to enter. Even though your ship isn't present, raise the upgrade station by way of the terminal beside the landing pad. Ride up the lift in the corner to the top of the damaged platform, then leap across atop the raised upgrade station. Make your way over to the command station by way of the Grab Ledge (and extend a platform with the Grapple Lasso). Once inside, activate the terminal to open up the hangar doors. Then simply scale back down to ground level, lower the upgrade station, summon your ship then hit the switch again to receive the Ship Missile upgrade. |
| Go to walkthrough | |
 |
Hyper BallThe Hyper Ball adds a potent Morph Ball Hypermode attack form. While in Hypermode, simply hold A when in Morph Ball mode to unleash a continuous electrical Phazon attack to automatically injure anything close by. Certain Phazon growths in the environment can only be eliminated with this attack.Found in: Bryyo Seed (Bryyo Leviathan Core) Defeat the monstrous Mogenar in the heart of the Bryyo Seed to receive this upgrade. Refer to the bosses guide for tips to survive the heated battle in one piece. |
| Go to walkthrough | |
 |
Boost BallThe trusty Boost Ball upgrade performs exactly as it has throughout the Prime series. Capable of boosting Samus around at higher speeds while in Morph Ball mode, hold B to charge the device and release to send Samus on her way. Use the Boost Ball to activate Spinner devices, charge up inactive Kinetic Orb Cannons and ascend half-pipes in the environment with ease (boost as you land in the pipe and accelerate towards the opposite side to build vertical momentum).Found in: SkyTown (Ballista Storage) You'll need to face and defeat the frenetic Defense Drone in the Ballista Storage chamber to score this upgrade. Upon discovering Ghor's powered-down armour suit on the Spire Pod, head right and continue in that direction to eventually locate the Ballista Storage area (and the Boost Ball before it's promptly snatched away from you). Refer to the bosses guide for tips to shut the drone down to score your prize. |
| Go to walkthrough | |
 |
Plasma BeamWith the stacking nature of beam weapons in Metroid Prime 3, the Plasma Beam's primary fire combines with the Power Beam to deliver long lances of super-heated energy capable of melting most targets. Along with its potent attack power, use the Plasma Beam to open orange doors, repair damaged circuit panels and melt damaged debris.Found in: SkyTown (Main Docking Bay) You must stop Ghor's rampant behaviour to score the Plasma Beam. Upon watching the short skirmish between Ghor and Samus below Aurora Unit 217's chamber, quickly return to your gunship at the Main Docking Bay to find the weirdo doing a number on your ride. Step outside to face him in a final showdown. Refer to the bosses guide to learn a few tips to bring the hunter to an unfortunate end. |
| Go to walkthrough | |
 |
Screw AttackThe Screw Attack upgrade allows Samus to cross otherwise inaccessible horizontal regions with ease. She can also utilise Wall Jump surfaces to scale tall shafts. As it has throughout the Metroid series, while active the Screw Attack generates deadly energy around Samus to protect her from any hostiles wandering into her flight path.Activate the Screw Attack by holding forward and pressing B again after performing a Space Jump. Press B repeatedly up to five times to keep Samus in the air as she travels horizontally (experiment with timed jumps to extend her flight distance). Screw Attack into a Wall Jump surface and continuously press B to scale vertical shafts with ease. Found in: Bryyo (Bryyo Ice - Hall of Remembrance) Thankfully this time you'll discover the Screw Attack early in the game. Upon defeating Ghor and scoring the Plasma Beam, you'll eventually discover a tall shaft lined with Wall Jump surfaces leading to the SkyTown East tram. With no way of scaling the shaft, Aurora Unit 217 will suggest backtracking to Bryyo in search of new items. So let's do just that. Return to Bryyo and land at the Fiery Airdock. Head for the Main Lift chamber and use the Snatchers deep inside the narrow tunnels to reach the second floor. Once there, you may remember spotting a tunnel fashioned in the shape of a lizard's open mouth filled with frozen ice. Use your Plasma Beam to clear the obstructions and roll through to find a hidden room beyond. Step inside to discover a large round chamber inhabited by a huge frozen battering ram in the ceiling and a lone inactive stone Golem. First melt the ice around the battering ram before using a Morph Ball Bomb to activate the Golem. The Golem will promptly slam the object into a huge gong, summoning a Spinner device. Use the Spinner to rotate the chamber's walls to reveal a cracked wall. Activate the Golem again and watch as it uses the battering ram to crash through the weakened wall. Step into the newly revealed chamber and enter the teleporter to find yourself in a truly alien environment to the rest of Bryyo. Explore around to eventually find the Screw Attack waiting in the grand Hall of Remembrance. |
| Go to walkthrough | |
 |
Ship GrappleThe second and final upgrade for Samus' gunship, the Ship Grapple grants the gunship its very own Grapple Beam capable of lifting ridiculously large objects several times the gunship's own weight and size. Simply use the Command Visor to summon your ship to lift objects possessing Ship Grapple Points. Note that if you summon the ship to a landing pad while it's carrying an object, the object will be returned to its original location.Found in: SkyTown (Eastern SkyTown - SkyTown Federation Landing Site) Upon arriving at SkyTown East, explore the area and pass through the Chozo Observatory and over Skybridge Athene to eventually locate the SkyTown Federation Landing Site. Aurora Unit 217 will summon a Bomb Slot, activate it to lower the shutters blocking the landing pad. See the small terminal overlooking the landing pad? Summon your ship and simply activate the terminal to receive the Ship Grapple upgrade. |
| Go to walkthrough | |
 |
Seeker MissileThe Seeker Missile upgrades Samus' Missile Launcher with a ballistic delivery system capable of launching up to five missiles at once. Hold Down on the D-Pad to engage the system, then simply wave the targeting reticule over single or multiple targets to line each one up, then release to send your payload on its way. Use this effective weapon to strike multiple targets all at once, and use it to dismantle objects and doors sealed with several locking pods.Now normally as you engage the Seeker Missile you'll waste a single missile in the process. Oddly enough, if you activate the Scan Visor, hold Down on the D-Pad, then press Minus to return to the Combat Visor, Samus will engage the Seeker Missile's targeting reticule without firing a missile first. Found in: SkyTown (Eastern SkyTown - Xenoresearch B) Soon after upgrading your ship and receiving the Ship Grapple you'll find yourself inside a chamber filled with the husks of Space Pirate foes. You know what that means. Continue to explore the area to discover corridors lined with dozens of Phazon Metroid specimens, all itching to get their pincers on you. Eventually you'll discover the power source of this area, an Energy Cell locked inside a station beside a containment pod containing the Seeker Missile. Use the Grapple Lasso to tear off the cover on the Energy Cell, then extract it to power down the containment pod's force field. Simply fire a Missile at the pod to breach the glass and gain access to your prize. |
| Go to walkthrough | |
 |
Hyper MissileThe Hyper Missile adds ballistic capabilities for Samus in Hypermode. Simply fire a Missile while in Hypermode to deliver an incredibly powerful blast of Phazon. Don't blindly fire it around too much though as each blast significantly drains your Phazon meter. Large spiky growths of Phazon can be destroyed by a single Hyper Missile or two.Found in: Elysia Seed (Elysian Leviathan Core) Defeat Helios in the core of the Elysian Leviathan Seed to receive the Hyper Missile (and a dose of corruptive Phazon). Refer to the bosses guide for tips to shut the rogue droid and its Swarmbot cronies down. |
| Go to walkthrough | |
 |
X-Ray VisorCombining the Thermal Visor and X-Ray Visor from Metroid Prime, Metroid Prime 3's X-Ray Visor grants Samus an effective night-vision apparatus along with the ability to detect high concentrations of Phazon (notice the bright glow from Samus' bones). Hold Minus and point at the lower-left corner of the screen to activate the visor.You'll find plenty of use for the X-Ray Visor. Use it in tandem with the Nova Beam to penetrate Phazite shields and strike the glowing Phazon cores of foes such as Phazon Metroids, Commando Pirates and Berserker Knights. The X-Ray Visor can also reveal the location of any enemy capable of cloaking itself. Finally, use the X-Ray Visor to access certain interface terminals otherwise inaccessible. Take note however that Hypermode-enabled enemies in close proximity will wreck static havok on the X-Ray Visor. Found in: Pirate Homeworld (Pirate Command - Command Vault) Travel to the Command Courtyard and disable the ventilation fans by extracting the Energy Cell directly above the fans. Roll through the ventilation tunnels to discover the Command Station - carry on through here to discover the Command Vault area where the X-Ray Visor awaits. Look up - see the five orange pods above? Simply use the Seeker Missile to strike all pods at once, revealing the X-Ray Visor as your prize. |
| Go to walkthrough | |
 |
Grapple VoltageThe final Grapple Beam addition adds a curious feature: the ability to drain or charge terminals. Throughout the Pirate Homeworld you'll discover energy force fields powered by a nearby terminal. With this upgrade equipped simply attach the Grapple Lasso to the terminal and push forward to overload the terminal with energy, or hold back to drain the system of juice.Certain objects and foes can also be powered/overloaded or drained, just look for the C icon to see if the Grapple Lasso works. Amazingly, you can also drain energy from grappled enemies to restore your own health (in small amounts). Found in: Pirate Homeworld (Pirate Research - Proving Grounds) Defeat Gandrayda in battle to receive this Grapple Beam addition. First pick up the map of the Pirate Homeworld at the Lift Hub to reveal the Pirate Research area. Fly your ship there and explore the region to ultimately discover Gandrayda disguised as a Federation Marine. Refer to the bosses guide for tips to survive the showdown with Dark Samus' final puppet. |
| Go to walkthrough | |
 |
Spider BallThe Spider Ball completes Samus' Morph Ball mode functionality. With this upgrade equipped Samus can attach to magnetic rails while in Morph Ball mode to access otherwise inaccessible regions.Simply hold Z to attach to a magnetic rail and move around freely. While holding Z, lay a bomb to propel Samus off the track. Also use the Boost Ball to launch Samus away from the track on a perpendicular vector to reach adjacent tracks or distant platforms. Found in: SkyTown (Powerworks) Upon securing the Grapple Voltage you'll be clear to locate the Spider Ball. Return to Elysia and set down at Landing Bay A. Travel to the Junction area and head south. Beyond you'll discover an elaborate gate system blocking access to a Zipline Cable. Simply attach the Grapple Lasso to the gate and deliver enough energy into the device to release the lock and move the gate out of your path. With your path clear, ride the Zipline Cable along till it malfunctions and drops you off on a platform halfway along. Look towards the structure beyond the drop and Screw Attack across to make the distance. Head inside and roll down into the main chamber of the Powerworks. Here you'll discover a tall pillar in the centre below a set of rotating gears in the ceiling. Look closely, see the fallen cog on the ground? Stand atop the raised platform nearby and look down at the cog. Deploy the Grapple Lasso and pull back to launch the cog into the air. Quickly lock on as it spins and fire a Missile to snugly send it back into place among the other gears. With the system operational again the pillar will open wide, revealing the Spider Ball within the grasp of an elaborate Chozo statue. |
| Go to walkthrough | |
 |
Hazard ShieldWith the Hazard Shield equipped Samus can safely traverse hostile and caustic environments without harm. She'll be able to pass through regions on the Pirate Homeworld under constant acid rain bombardment without a scratch, and can wade through formerly-dangerous Fuel Gel pools on Bryyo.Found in: Pirate Homeworld (Pirate Research - Craneyard) You'll need the Spider Ball to successfully find your way to the Hazard Shield. Head to the Pirate Research region of the Pirate Homeworld and back to the Craneyard area. Look for a tall Spider Ball track running up a wall and follow it along. You'll eventually find yourself inside a snug compartment below the giant central structure outside in the deluge of acid rain. Use the two Spinners present to rotate the pair of rotating sections of the structure to line up a clean passage up to the top (be sure to grab the Missile Expansion hiding up over on the right of the structure). See the tunnel up on the left side leading away from the structure? Line up the rotating tunnels to create a clear path up there, then climb up and move through to find yourself inside a small command alcove overlooking the Craneyard. Simply activate the lone terminal there to summon the Hazard Shield to your position. |
| Go to walkthrough | |
 |
Nova BeamThe Nova Beam adds to Samus' arm cannon a glowing green energy blast capable of penetrating objects composed of Phazite. Used in tandem with the X-Ray Visor, objects hidden behind Phazite shields or armour can be struck flawlessly with each shot. Also use the Nova Beam to open green doors.Found in: Pirate Homeworld (Pirate Mines - Main Cavern) You've got a long journey ahead to the Nova Beam. Head to the Mining Site of the Pirate Homeworld and explore the region to ultimately find yourself at the Main Cavern. See the Nova Beam inside the Phazon mining chamber? You'll first need to find your way inside. Walk around the enclosure and activate the terminal on the far side to power up a nearby elevator. Ride the elevator down and enter the chamber to face a Pirate welcoming committee. See those access hatches surrounding the chamber? A trio of Pirates will attack in waves, usually comprised of Assault Pirate Troopers and Commando Pirates. They won't stop coming, so you'll need to focus on the task at hand. Normally the massive Phazon mining equipment will spend its time drilling the ore below the chamber, but watch out when a massive beam erupts in the center to draw up loose Phazon minerals. As it does so all your foes will scramble to grab hold of something before being sucked up into the beam. Quickly target one and fill them with enough firepower to break them loose and straight up into the beam. With the beam disrupted four odd glowing objects appear below the Nova Beam's pod. Quickly target one and shoot it before they retract. Hold out till the beam begins sucking everything towards itself again and send another hapless Pirate straight into it (use Hypermode to avoid taking too much damage in the crossfire). Shoot down another of the red objects and repeat the sequence till all four objects blow. With all targets down the Nova Beam will plummet to ground level; leaving you clear to claim your prize. |
| Go to walkthrough | |
 |
Hyper GrappleThis final Phazon-powered ability enables Samus' Grapple Voltage while in Hypermode. Simply attach the Grapple Lasso to a target while in Hypermode and hold forward to deliver energy towards the target to overload it with excessive Phazon energy. Certain Phazon growths can only be destroyed by overloading them with energy from the Hyper Grapple.Found in: Pirate Seed (Pirate Homeworld Leviathan Core) Send Omega Ridley to oblivion deep inside the Pirate Homeworld Seed to receive your final suit upgrade. Refer to the bosses guide for tips to score victory against yet another form of Ridley. |
| Go to walkthrough | |
Samus' Upgrades | Missile Locations | Ship Missile Locations
Energy Tank Locations | Energy Cell Locations
 |
Morphing BallThis special ability allows Samus to assume the shape of a small metallic ball - perfect for crawling through narrow tunnels throughout the terrain. You'll also be given the ability to plant bombs in this mode once you've found the Bomb upgrade. |
 |
Missile TanksMissile Tanks litter the corridors and shafts of Zebes, you'll be finding plenty of these while exploring the vast caverns. Each Missile Tank found adds a further five missiles to Samus' maximum arsenal. Defeating Kraid and Ridley will also reward you with a healthy batch of missiles. You'll be able to find a maximum limit of 255 missiles. |
 |
Long BeamInitially, Samus' arm cannon's range will be quite short, but once this weapon's found early in the game her shot range will reach the edge of the screen for any weapon type equipped. You'll also be treated to a new sound effect for Samus' beam projectiles. |
 |
Energy TanksThis will give Samus an extra 100 energy units to her current maximum health level - definitely something you need. You'll be able to carry up to a maximum of six energy tanks, but eight are hidden throughout the game. |
 |
BombWhile in Morphing Ball mode, Samus can plant bombs that damage any enemies within range. The bombs can also break open certain blocks to uncover hidden tunnels in the environment. |
 |
Ice BeamThe Ice Beam changes Samus' beam to a freezing shot, any enemies struck by the beam will be instantly frozen. Shoot the target again to unfreeze it. While an enemy is frozen Samus can jump on top of them without taking damage. You'll need the Ice Beam when venturing into Tourian near the end of the game as it'll be critical when facing Metroids. |
 |
High Jump BootsThis grants Samus the ability to jump much higher than her normal jumping height. |
 |
Screw AttackThis deadly ability allows Samus to charge up energy in her body while performing a somersault jump. When Samus jumps, she'll begin flashing indicating that the Screw Attack's in action. Any enemies coming in contact with Samus won't stand a chance. |
 |
Wave BeamGives Samus' arm cannon the ability to fire a series of energy balls that fly in a wavy pattern. The pattern of the shots can greatly help in destroying smaller enemies and gives Samus a wider firing range. |
 |
Varia SuitThe Varia Suit greatly enhances Samus' Power Suit, reducing damage inflicted by enemies. |
 |
Missile TanksMissiles are found throughout SR388. Each one adds ten missiles to Samus' maximum payload. You'll need to use missiles to inflict critical damage on Metroids. |
 |
Energy TanksEach one grants Samus an extra 100 energy units above her current maximum health level - definitely worth picking up. |
 |
BombOnce you've found this, press B while the Morphing Ball is active to lay a bomb. You can use these bombs to destroy nearby enemies or break open certain blocks hidden around the environment. |
 |
Ice BeamThe Ice Beam can freeze any enemy upon contact. While an enemy's frozen you can safely jump atop them without taking any damage. If you fire again at an enemy while they're frozen they'll explode. You'll need the Ice Beam near the end of the game to successfully destroy any free-floating standard Metroids. |
 |
Spider BallThis special technique allows Samus to crawl around the floors, ceilings and walls of SR388. While in Morphing Ball mode press down to activate the Spider Ball, you can then freely crawl around the terrain by holding left or right. Be careful to avoid enemies as they'll knock Samus off walls and ceilings. |
 |
Wave BeamThe Wave Beam gives Samus a rapid-firing beam that emits small energy balls travelling in a wavy pattern across the screen. This weapon greatly enhances accuracy against smaller targets. |
 |
High Jump BootsThese allow Samus to jump more than twice her normal jumping height. |
 |
Spring BallSamus can jump while in Morphing Ball mode with this equipped. |
 |
Varia SuitThe Varia Suit greatly enhances Samus' power suit, introducing the bulky shoulder design that became her instantly-recognisable image for the rest of the series. Damage inflicted by enemies will also considerably drop. |
 |
Space JumpWhen Samus somersault jumps through the air, continually press A to jump higher with the correct timing. This way you can effectively fly through the air and climb to greater heights. |
 |
Spazer Laser BeamThis weapon fires three wide angle beams simultaneously. Similar to the Wave Beam, the Spazer also greatly enhances accuracy to strike enemies easily. |
 |
Plasma BeamThe Plasma Beam fires a single large bolt capable of passing through solid walls, ceilings and floors. The strongest beam weapon of the game, not even contact with a target will stop the beam from going on its way. |
 |
Screw AttackWhen Samus jumps through the air and performs a somersault jump, she'll charge up energy around her body with this device. Any enemies coming in contact won't survive. |
 |
Morphing BallThe Morphing Ball grants Samus the ability to morph into a small metallic sphere. While in this mode Samus can easily roll through small openings not normally accessible and plant explosive bombs (once you find the Bomb upgrade and further Power Bombs).Found in: Brinstar Hands down the easiest power-up to find. When you first enter Brinstar at the beginning of the game go left from the main elevator to find the Morphing Ball in plain sight behind a large cluster of rocks. |
| Go to walkthrough | |
|---|---|
 |
BombThe Bomb power-up allows Samus to lay small explosive bombs while in Morphing Ball mode (press X to lay bombs). The bombs can dismantle certain small blocks in the environment, damage enemies and can even propel Samus straight up into the air while in Morphing Ball mode.Found in: Crateria Back near Samus' ship in Crateria, head inside the cavern to the left of the ship. Near the three Skree (the green flyers that dive-bomb from the ceiling), you should see a small opening in the ground. Use the Morphing Ball to descend to the shaft below, then head through the door you find. Go through the next corridor (blast the small enemies here for energy and missile refills), then use five missiles to blow open the purple door at the far end. Make sure you've got at least ten missiles before you step inside the chamber, then head in and grab the Bomb upgrade. Once you secure it the door leading out will seal and the Chozo Statue will come to life - refer to the bosses guide to put it down for good. |
| Go to walkthrough | |
 |
Charge BeamThe Charge Beam allows you to hold down the fire button to charge up a stronger energy blast. If you hold down the fire button and perform a somersault jump while the beam is charged, you'll perform a simple Screw Attack-type attack, any enemy that strikes Samus will suffer damage.Found in: Brinstar Once you reach the large pink room in Brinstar with the falling snowflakes in the background (the room where the top right door leads up to Spore Spawn's room) go down to the very bottom left corner of the room (you'll also find a missile there) and bomb open the two small visible blocks side by side. Descend through the opening to find the Chozo statue below holding the Charge Beam. |
| Go to walkthrough | |
 |
SpazerThe Spazer Beam allows Samus to fire three wide-angled horizontal beams with a faster rate of fire and an increased damage level.Found in: Brinstar In Brinstar, go to the room to the left of the underwater Maridia area (the room with the two claws resting in the water that lash out and try to grab Samus). Go to the far left side of the room and shoot the cracked block directly above. Jump up through the hole to the ledge high above, if you have the Hi-Jump Boots you'll make the jump easily, otherwise just wall-jump off the wall on the left and higher to reach the platform. Go through the narrow tunnel above to find a green door on the right. Blow the door open with a Super Missile to find the room with the Spazer upgrade. |
| Go to walkthrough | |
 |
Hi-Jump BootsSimply put, the Hi-Jump Boots will increase Samus' jumping height, allowing her to reach greater heights and leap further distances.Found in: Norfair From the main elevator in Norfair, descend right down to the bottom of the shaft to where two doors are facing each other. Head through the door on the left to find an Energy Tank straight ahead. Go through this room and navigate down the narrow shaft to reach another door below. Go through and blast the upper part of the wall away in the next room to reach the Hi-Jump Boots. |
| Go to walkthrough | |
 |
Varia SuitThe Varia Suit greatly enhances Samus' Power Suit by providing her with extra protection that cuts 25% of the damage inflicted by enemies. The Varia can also protect Samus from extreme temperatures, specifically the melting-point extreme heat found in the bowels of Norfair.Found in: Brinstar You'll need to defeat Kraid before finding the Varia Suit (refer to the bosses guide). Once you finish Kraid, simply go through the door on the right side of the room to find the Varia Suit. |
| Go to walkthrough | |
 |
Speed BoosterThe Speed Booster allows Samus to run incredibly fast while charging up energy in her suit (dash for a while to active it). While the Speed Booster is active any enemies Samus runs through will be completely blown away. Samus can also break through special blocks with arrows printed on them while the Speed Booster is active. Refer to the Secrets and Endings section to learn more about the Speed Booster's special Shinespark abilities.Found in: Norfair In the large green room beyond all the lava caverns to the right of the main elevator, you'll need to reach the upper door on the right side of the room - travel down to the door in the floor at the base of this room and follow the path from there to eventually reach it. Once through the upper door, wait for the Skree to crash down into the lava, then blow open the roof section above to reveal a hidden shaft. Climb up and head through the right door. Run through the long sloping cavern while blasting any enemies along the way. Upon reaching the door on the far right of the hallway (fire up at the roof to reveal a missile), go through to claim the Speed Booster. Once you score it you'll have to use it straight away to escape from the rising lava, go back into the long hallway and dash left to escape. |
| Go to walkthrough | |
 |
Ice BeamThis beam grants Samus the ability to freeze smaller enemies to use them as stepping-stones. Once an enemy is frozen, a second shot will unfreeze or destroy them.Found in: Norfair From the entrance of Norfair, head through the first door on the left further down the shaft. Run past all the closing shutters with the Speed Booster to the far end of the corridor. Head through the door there and cross the lava pits in the next room. The room beyond will contain a large shaft leading skyward, head up to the top while avoiding the fire- breathing heads on the walls. On the way up you should spot a small opening on the right side where a few small enemies crawl through, that's where you need to go. Once at the top bomb out the small platform in front of the door to descend below to the small opening in the wall. Activate the Morphing Ball then plummet down the hole and hold right to sneak into the opening. Head through the door on the right to find the Ice Beam inside. |
| Go to walkthrough | |
 |
Grappling BeamThe Grappling Beam is an electric chain used to swing Samus to previously unreachable areas. The beam can grab onto small blocks with crosses embedded on them, once attached Samus can swing back and forth before releasing the beam. The beam can also be used to open blue doors.Found in: Norfair After you defeat Crocomire in Norfair, head through the door on the left side of the corridor where you fought him. Move through the door in the ground of the next room to locate a tall shaft descending below. Drop down the shaft and go through the door at the base in the floor. You'll now be in an underground cavern littered with crumbling debris. Blast the small fireflies nearby and lay a Power Bomb to clear the rubble. Go over to the right corner of the cavern and dash to the left, you'll break through a wall with the Speed Booster and open up access to a massive cavern beyodn. As soon as you reach the edge of the cliff just after breaking through the wall press and hold jump. With your forward momentum and the Speed Booster's power you'll perform a massive somersault leap and fly through the cavern. Upon landing you'll be facing a door high up in the top left corner of the cavern. Step inside to find the Grappling Beam. |
| Go to walkthrough | |
 |
Wave BeamThe Wave Beam will enable Samus' energy beam projectiles to fly forward in a twirling cylindrical fashion and can penetrate any walls, floors or ceilings.Found in: Norfair You'll first need to have the Grappling Beam in your possession before you can find this. In Nofair, from the main elevator go through the first door down on the right below. Keep heading right through all the huge lava caverns and you'll reach a large green environment. On the right side of the room are two doors, you'll need to get through the lower one of the two, but you might have to go around below to reach it, or you can try to use the Grappling Beam to reach the opening above where the red creature that spews spines lives. On the other side of the door is a shaft leading down full of red bouncing balls and the enemies that leap up out of the ground. Two doors lead off on the right side of the shaft, go through the top one and you'll find yourself in another large chamber full of the floating platforms that slowly fall as you stand on them. Traverse the platforms to the right and you'll reach a shutter. Hit the blue switch to open the shutter and jump up to the ledge to find a missile waiting there. Keep going right and use the Grappling Beam to cross the chasm, then head through the door on the other side to claim the Wave Beam. |
| Go to walkthrough | |
 |
X-Ray ScopeThe X-Ray Scope allows Samus to scan any currently-visible area to reveal any hidden passages or items. When in use, all other action on-screen will freeze so you can safely scan rooms without enemies attacking. Select the X-Ray Scope, then press and hold B to use it and direct the field of view up and down with the Directional Pad.Found in: Brinstar You'll need the Grappling Beam to reach this. In Brinstar, about halfway up the long shaft leading down to Norfair (the one with orange walls and all the Rippers flying around) you should spot a yellow door along the left wall. Blow open the door with a Power Bomb and the wall in front of it to clear a path inside. Inside you'll find a darkened long hallway filled with a sea of spikes. Try to only freeze the floating enemies with the glowing balls, if you destroy too many of them the darkness will completely obstruct your vision. Eventually you'll need to use the Grappling Beam to cross yet more spikes, swing across and you'll reach a door on the far side of the hallway. In the next room, jump on top of the small ledge and lay a bomb to activate the pillar below. Once you rise up to the narrow tunnel above, go left and drop down to find the X-Ray Scope. |
| Go to walkthrough | |
 |
Gravity SuitThe Gravity Suit gives Samus maximum protection against enemy attacks, reducing damage inflicted to 50%. The suit also grants Samus free movement underwater and protection against lava in the upper regions of Norfair.Found in: Wrecked Ship You'll be able to find the Gravity Suit once you've done away with Phantoon (see the bosses section). Once he's gone and the power restores inside the ship, head back out to the main shaft and go all the way to the very top. Climb up though the door there and clear all the enemies in the next hallway. Once all your foes are done away with you can freely pass through the doors on the left and right sides of the hallway. Go through the left door to emerge back outside in Crateria. Go all the way to the left side of this region and use the X-Ray Scope to find a Super Missile block in the ground. Below this block you can find a missile, but further to the right you'll find (with the X-Ray Scope) blocks that can be bombed open. Descend through the narrow crawlspace and head right through the tunnel. Keep going right and you'll find yourself back inside the Wrecked Ship. Use the Grappling Beam to cross the sea of spikes below, eventually you'll reach a Chozo Statue standing tall without anything in its outstretched hands. Jump on top of its hands and activate the Morphing Ball, the statue will promptly come to life and march down to a secret area below the spikes. From down here you can head right to find a missile and a Reserve Tank, but if you go through the door on the left you'll discover the Gravity Suit waiting inside a small chamber. |
| Go to walkthrough | |
 |
Space JumpThe Space Jump allows Samus to perform a spinning mid-air somersault, but it differs from her normal jump. If timed correctly, you can repeatedly press the jump button to send Samus higher in the air while performing this move, this way she can effectively "fly" up high areas or safely fly over dangerous traps below.Found in: Maridia Located deep within Maridia, the only thing stopping you from reaching it is Draygon (see the bosses section). Once you finish off the creepy underwater specimen, head through the door on the left side of his chamber to find the Space Jump. |
| Go to walkthrough | |
 |
Plasma BeamThe Plasma Beam is the strongest beam weapon available to Samus and can destroy most smaller enemies with a single hit while inflicting heavy damage to larger ones. Keep in mind that when in use the Plasma Beam can't be used together with the Spazer Beam.Found in: Maridia You'll only be able to reach the Plasma Beam once you've finished off Draygon (see the bosses section). Once you've dealt with him and claimed the Space Jump, go way back to the first large cavernous room you found on the way from the main elevator (it's the huge room with the door leading down to the massive vertical pipe that takes you down to the lower levels of Maridia). Once back in the cavern, go to the very top right corner of the room and you should notice a door below on a platform that you can't reach if you just drop down from above (this door used to be sealed when Draygon was still alive). Use the Space Jump to reach the door then head through and up the next shaft. You'll eventually reach a large underwater room full of red Zebesians. Go to the bottom right corner to find the mother of all beams waiting there. |
| Go to walkthrough | |
 |
Spring BallAs its name suggests, the Spring Ball allows Samus to jump while the Morphing Ball is active.Found in: Maridia You'll need the Space Jump before you can reach this power-up. In Maridia, go to the bottom of the huge vertical pipe that takes you between the upper and lower levels of Maridia. Once there, head right and go through the sand-filled tunnel until you reach a single-screen room with a lone crumbling Grappling Hook block in the ceiling. Grab onto the block and wait for it to disappear, once it's gone Space Jump up the large shaft leading skyward. Watch out for the small flying bugs at the apex, then head right and descend the next shaft. Fall down through the purple ledges until you reach a door, then head through. The next long hallway possesses a a unique creature, a two armed robot that slowly progresses around the room using its arms. Quickly lay a Power Bomb to break open the purple wall ahead, the robot will then be able to penetrate through the sand-filled tunnel with its arms. Wait for the robot to clear a path, then head through the door at the end of the hallway. Phew, nearly there. In the next room, drop down the small hole in the ground and roll down the left passage below. Drop down to the bottom of the area and go right to finally locate the Spring Ball. |
| Go to walkthrough | |
 |
Screw AttackThe Screw Attack, when used in conjunction with the Space Jump, causes Samus to charge up deadly energy as she somersaults through the air. She can break certain blocks with this attack and can destroy most enemies that touch her.Found in: Norfair (Ridley's Lair) Not long after exploring Ridley's Lair for a bit you'll come across the second Chozo Statue boss fight. Once you take it apart go through the door on the right side of the heat-filled chamber to find the Screw Attack. |
| Go to walkthrough | |
Samus' Upgrades | Missile Locations | Super Missile Locations | Power Bomb Locations
Energy Tank Locations | Reserve Tank Locations
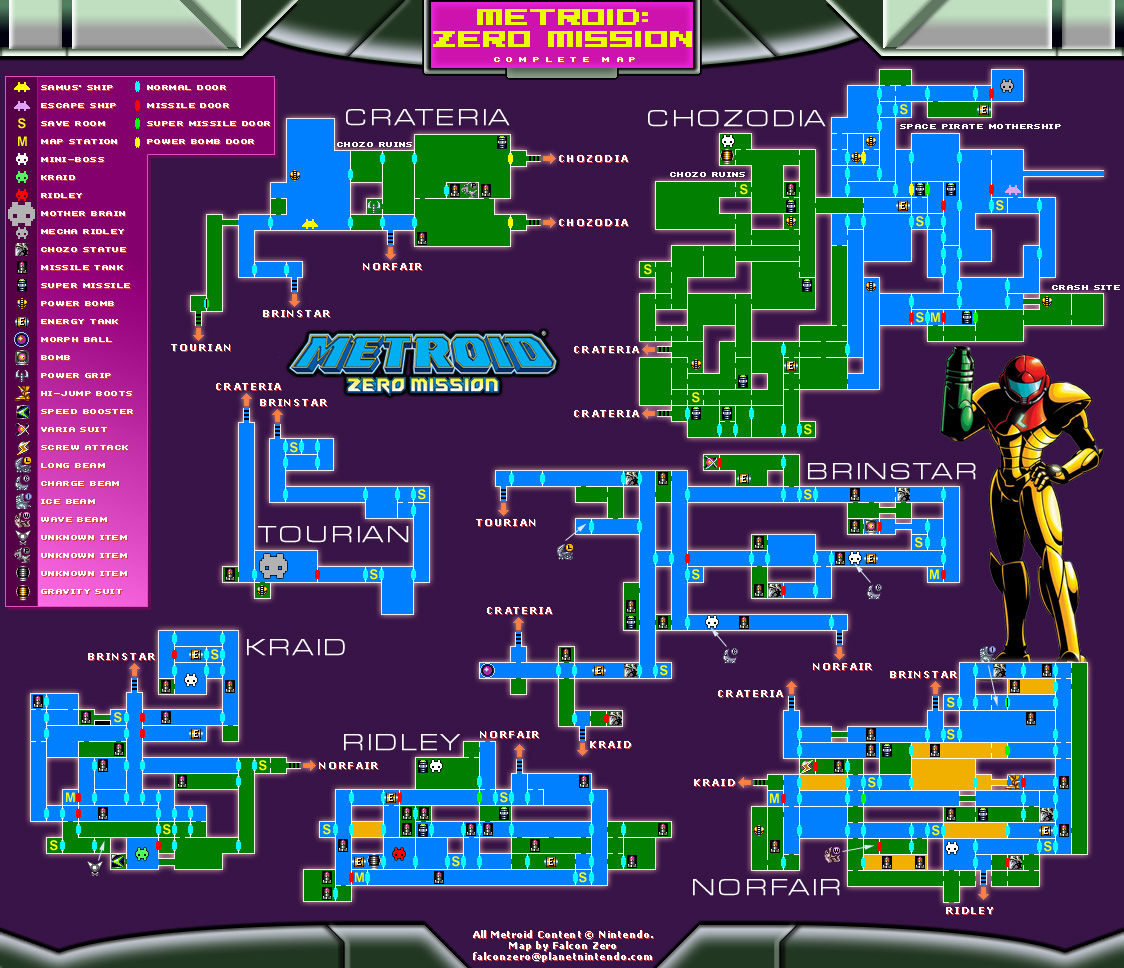
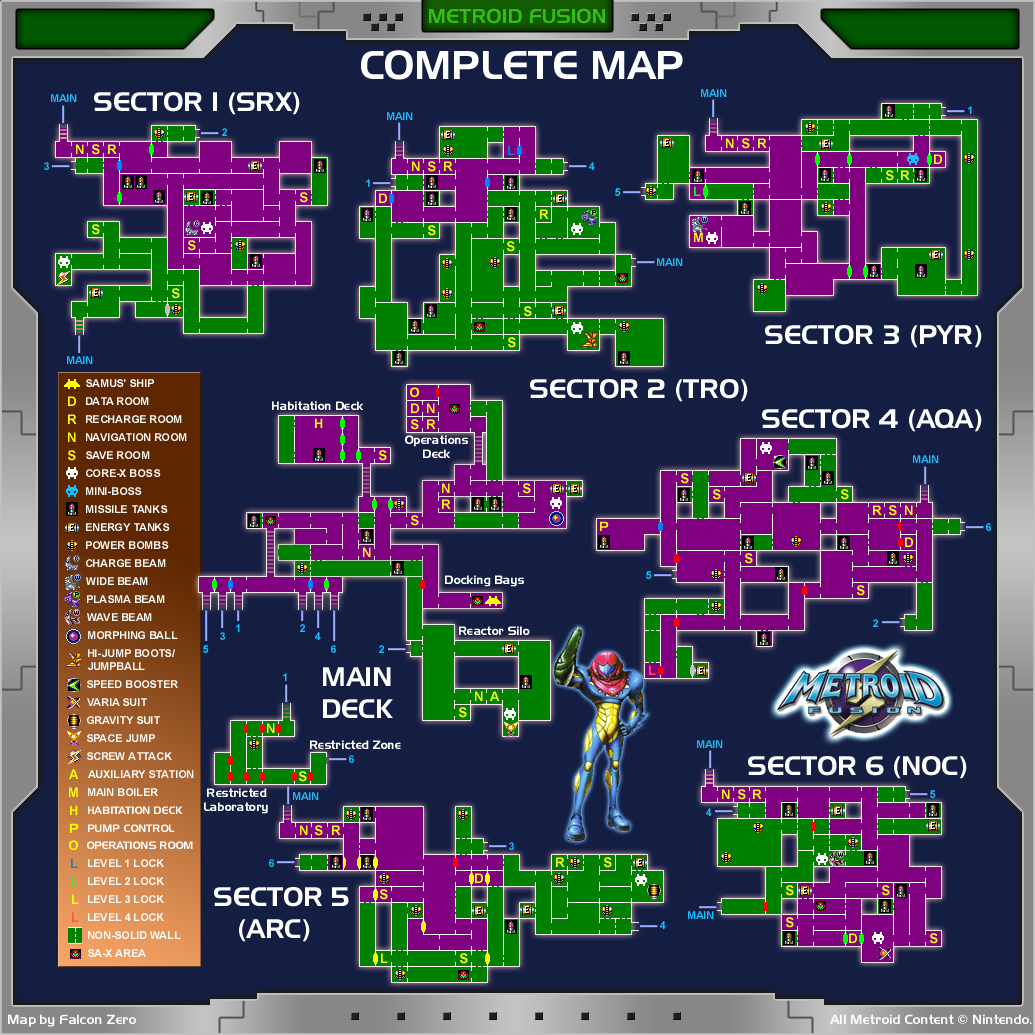
WHICH DO YOU THINK IS GONNA WIN? I GOT $50,000 ON SAMUS. (person in orange-red suit)